Monday, November 19, 2012

10 Ways to Reuse Vinyl Records

As promised, here is my list of 10 Ways to Reuse Vinyl Records.  I recently shared these tips at the Reuse Conex conference.  I can't give away ALL of my secrets, but these should get you inspired enough to give it a try.  Maybe you can make some cool holiday gifts.

 
1.  Paint a mandala.  You can see from my sign that it is really quite simple to design a mandala.  I always prime my record first, so I would suggest you start with a coat of primer to give it a nice even surface to paint on.  Usually after you've primed a record, you can still see the marks of concentric circles that exist on a record in the spaces where each song begins and ends.  You can use these concentric circles as guidelines for creating your design.  

Start in the center and work your way out, turning it as you go (I use a "lazy susan" turntable under my record), and just create patterns using basic shapes, building on each pattern until you reach the edge of the record.  Then you can go back and fill in with more shapes, and paint it with acrylic paints.  

You can draw your design with a pencil or pen.  I recommend not trying to erase much.  It's hard to erase pencil marks from the primer, and anyway you need to forget about trying to make it perfect and just do it.  Trust me, it will turn out beautiful even if all of your shapes are not exactly the same size and distance apart.  My mandalas are insanely imperfect all the time, but it does not matter.  

(If you need more instruction or if you are interested in exploring the meaning of mandalas and any spiritual symbolism that you might want to incorporate into your design, here are some links.)

There are two different ways that I create mandalas - the time-consuming way is to draw it, fill in each individual shape with paint, and then go back and outline.  That's how I do my complex pieces like this one:
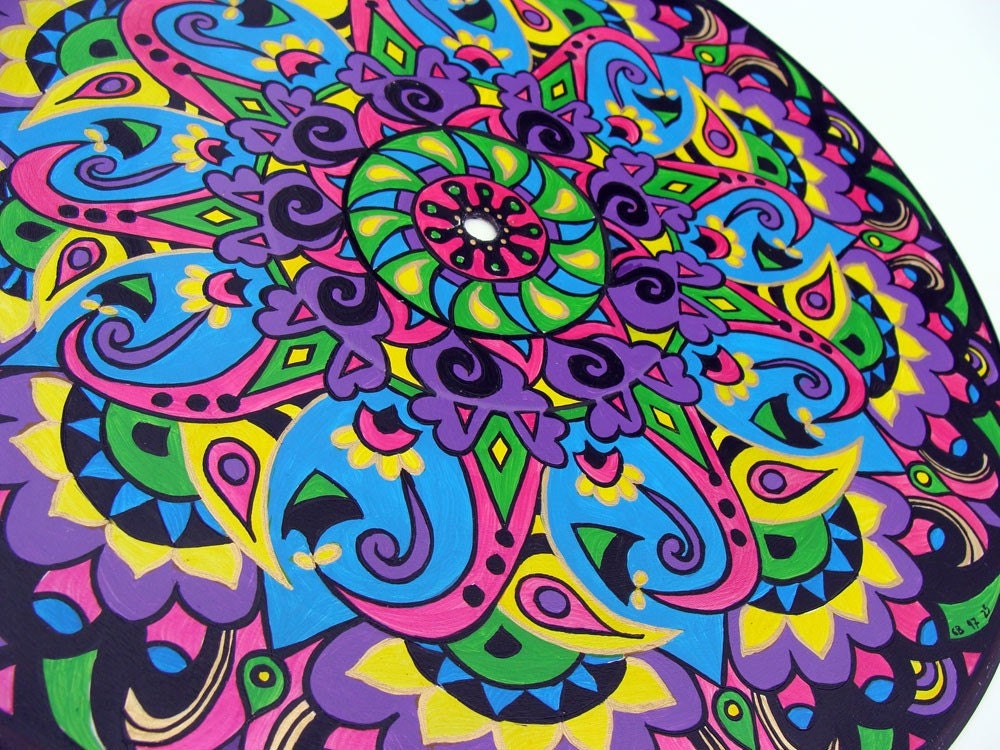
The easier and much faster way is to draw the design with a permanent marker (I like Sharpie Paint Pens) and then paint directly over it.  I use blending medium or glazing fluid to create a "wash" of paint that won't dry quite so quickly - then I can blend colors together (I use a fan brush) and the mandala design will still show through the paint. That's how this one was done - I just swirled some cobalt turquoise and phthalo green over my design and blended it together:
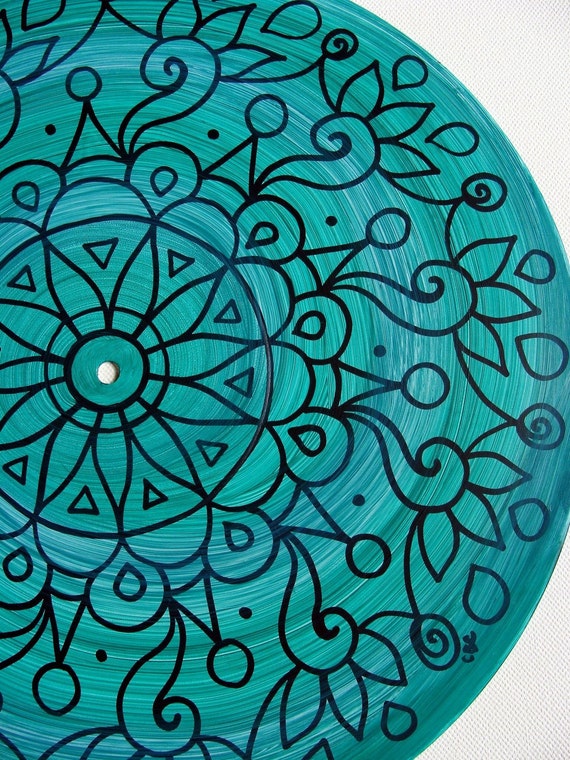

After it dries, you can pick and choose areas that you'd like to go back and highlight by filling them in with an extra punch of color, like I did here:  
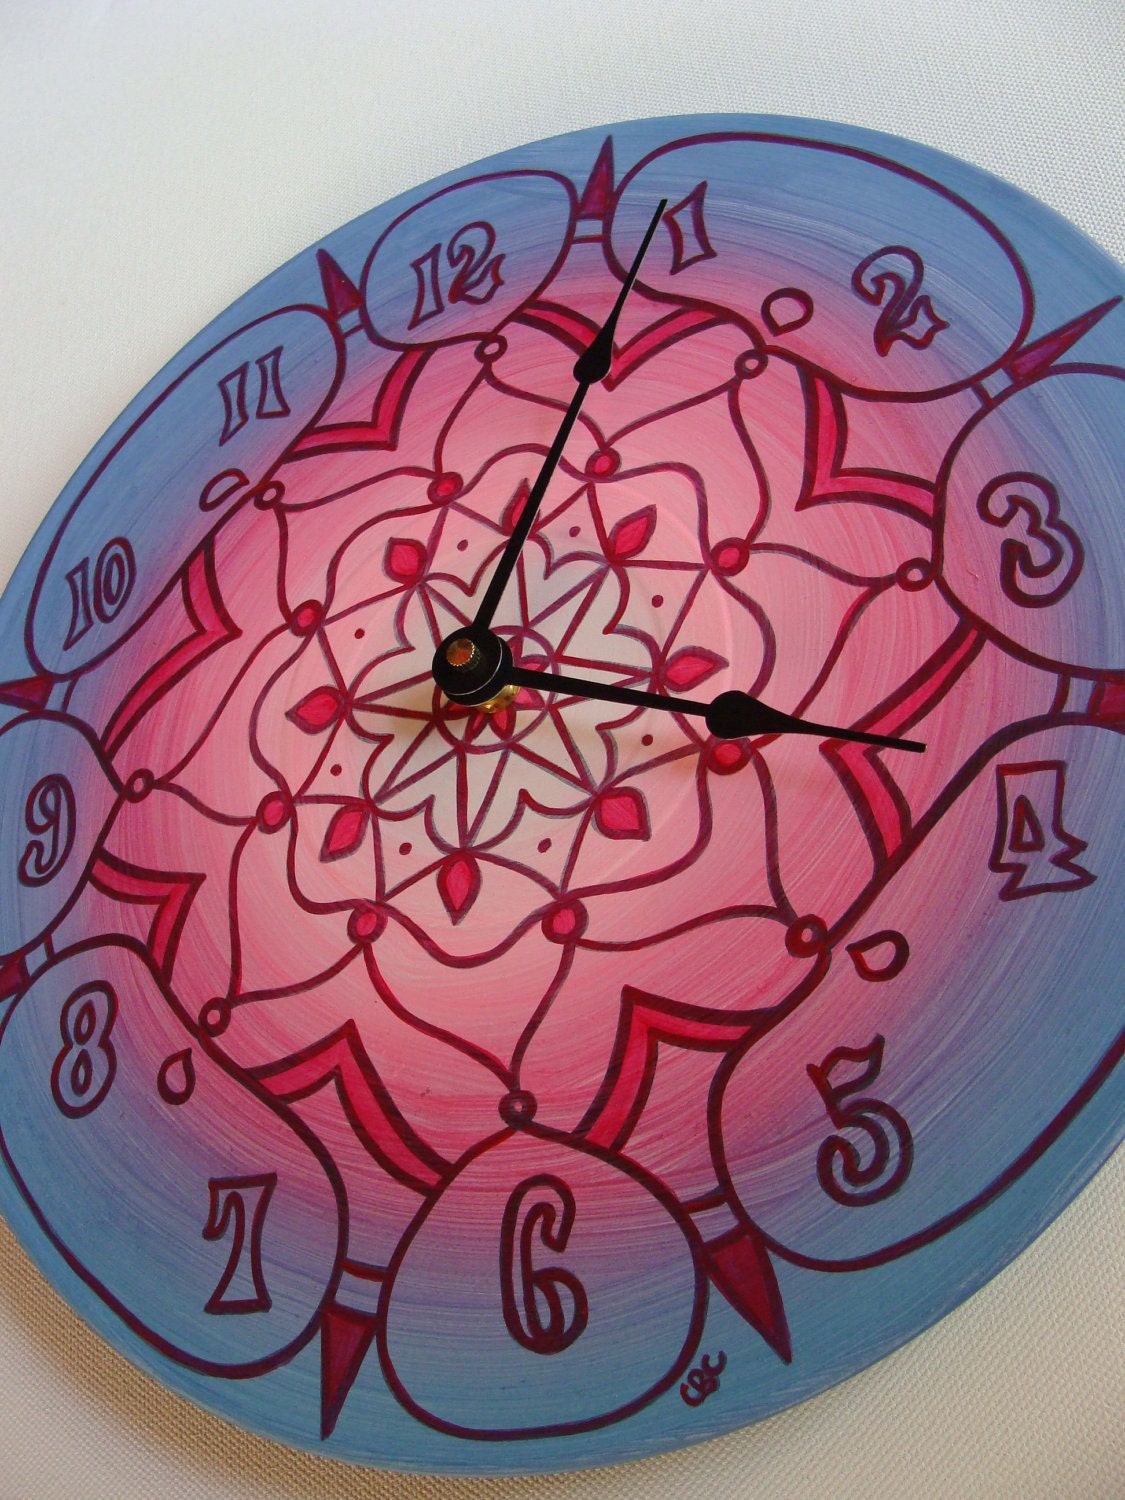

And that brings me to...
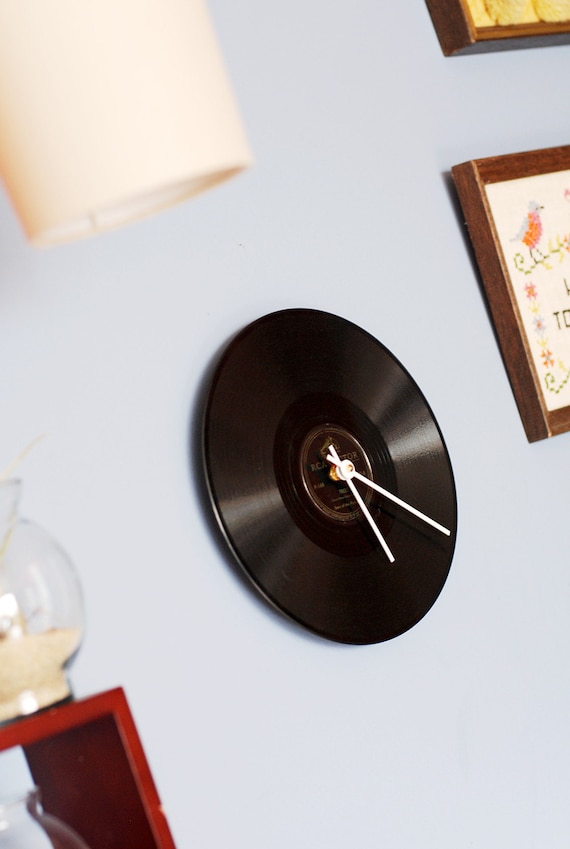
2.  Make a mandala clock.  Once you've painted a mandala on a record it is very easy to transform it into a functional wall clock! You can purchase single clock movements at craft supply stores such as Michaels. You might need to slightly widen the spindle hole in the record in order for the shaft to fit through it - this can be done easily with an X-acto knife.  If you want to have numbers on your clock, you need to make sure they are done properly and correctly spaced.  You could use any existing clock face to create your own template, or make your own.

3.  Make an unpainted clock. 
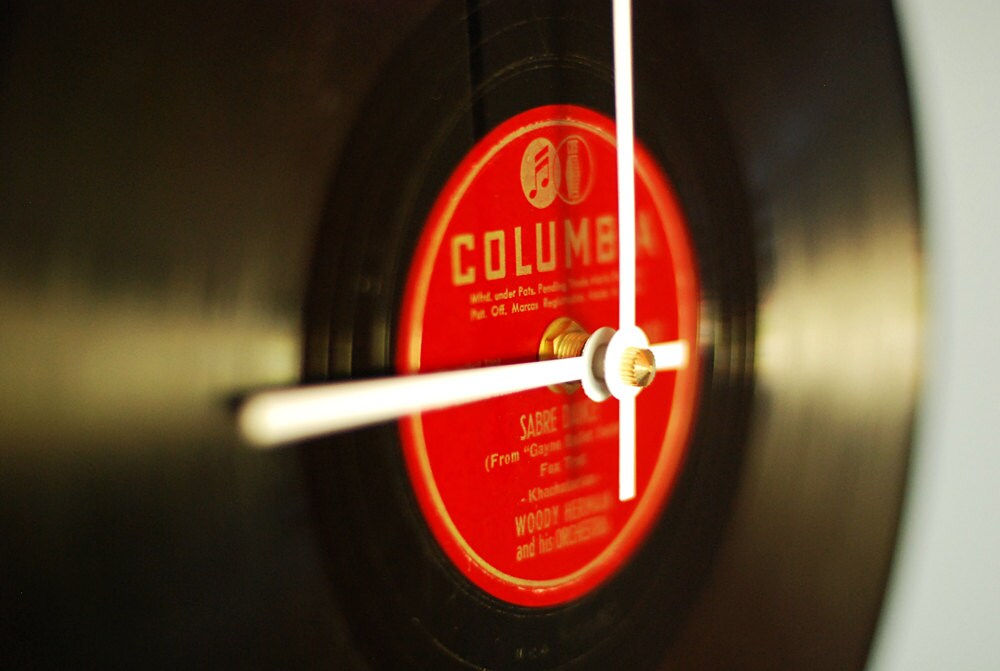
Well now this is just too easy!  Take a record and slap a clock movement on it and you are done!  I do this but only with my very special collection of vintage and antique (yes, some of them are more than 100 years old!) 78 rpm records (these records are 10" in diameter and are usually a bit thicker, heavier, and more brittle and easily breakable than 12" vinyl records, because they were made from a shellac-based compound).  I think that 78's are rare and lovely just as they are.  The titles, performers, logos, and even the scratches on the record all tell the story of a bygone era and I just can't bring myself to put any paint over that history.
I use white hands for these clocks - if you can't find white hands, you can always just hit the ones you've got with a little white spray paint.

Where to find 78 rpm records?  Look around - I have found them in "free boxes" on the side of the road.  You can check used record stores, thrift stores, garage sales, ebay, and the attics of any older people you may know. 

4.  Make a bowl


Here is the incredibly dorky video from my appearance on HGTV's "That's Clever."  I am making a Snowman Record Bowl, but you could do anything - a mandala bowl, or just an unpainted record that you want to make into a bowl.  In this video, I make the bowl in my oven, but I actually don't do that anymore - I use a heat gun.  Please make sure when heating records that you have good ventilation and protect your hands and face.  I always wear deerskin gloves and a respirator. 

5.  Make a cuff bracelet

Record cuffs are super easy to make.  Basically, I just chop up the record to create various sizes of vinyl strips which I then heat and shape around a mannequin wrist.  Then I sand all the edges.

I can get 8-12 cuffs out of a single record.  You can cut a record with heavy duty scissors or a guillotine-style paper cutter.  You can even use regular scissors if you just heat the record up a bit before cutting.  Experiment with different sizes and shapes.  If you don't have a mannequin you could use any sort of cylindrical item like a glass, bottle or can. 

Make sure to use a good flexible, newer vinyl record as opposed to an older record that is thicker and less easy to manipulate.

You can see all of my record cuffs here.

Jennifer Perkins of the Naughty Secretary Club has a great record cuff video tutorial here.  (She's my crafty hero!)

6.  Make a choker
This is very similar to the cuff except you will want to use a longer strip of record - the longest you can get it.  Use a ruler to mark out a 1" wide strip going all the way down the record, right up next to the label in the center and all the way to the top and bottom edges.  Then cut this strip, heat it, and experiment with wrapping it around a larger object so that it will go around your neck.  I used the "neck" part of a glass head.  This worked out perfectly.  The shape makes it cling to the neck even though it doesn't go all the way around it (although you could drill holes and link it up with some chain in the back if you want).  It is so lightweight that you can barely even feel it!  They kind of look like patent leather. I'm wearing one in this picture:


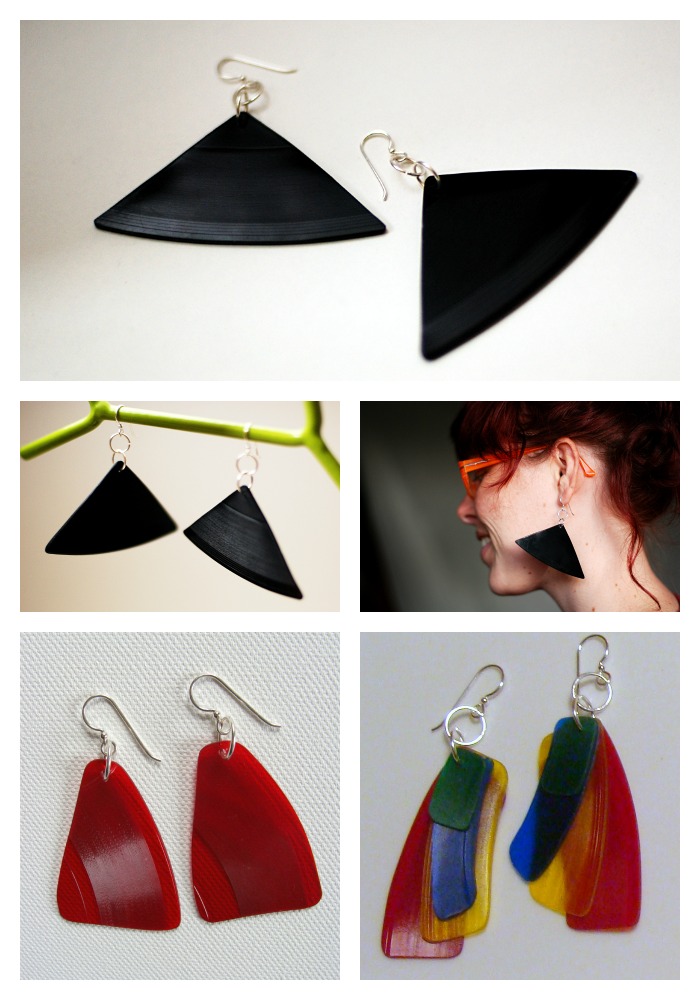
7.  Make beads for jewelry making 

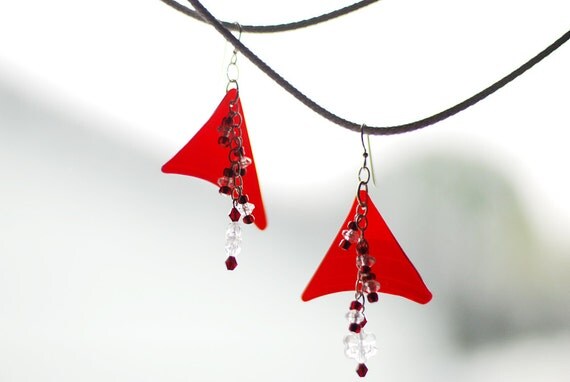
Every time I cut up a record to make cuffs, I end up with these triangle shaped pieces from the four "corners" of the record.   I know, a record doesn't have any corners, but still, I end up with triangles.  After saving them for years I finally started making earrings out of them.  So easy!  Just take your scrap pieces, drill a small hole, and add jump rings and ear wires, or do some fancy wire wrapping if you like.  Above you see some of the simple earrings I've made from bits of black and colored vinyl records.  These ones were designed by my daughter and include vintage beads:  
I also have various hand painted earring designs.  You can check out all of my earrings here.

8.  Make a mirror (from a 45 rpm record)
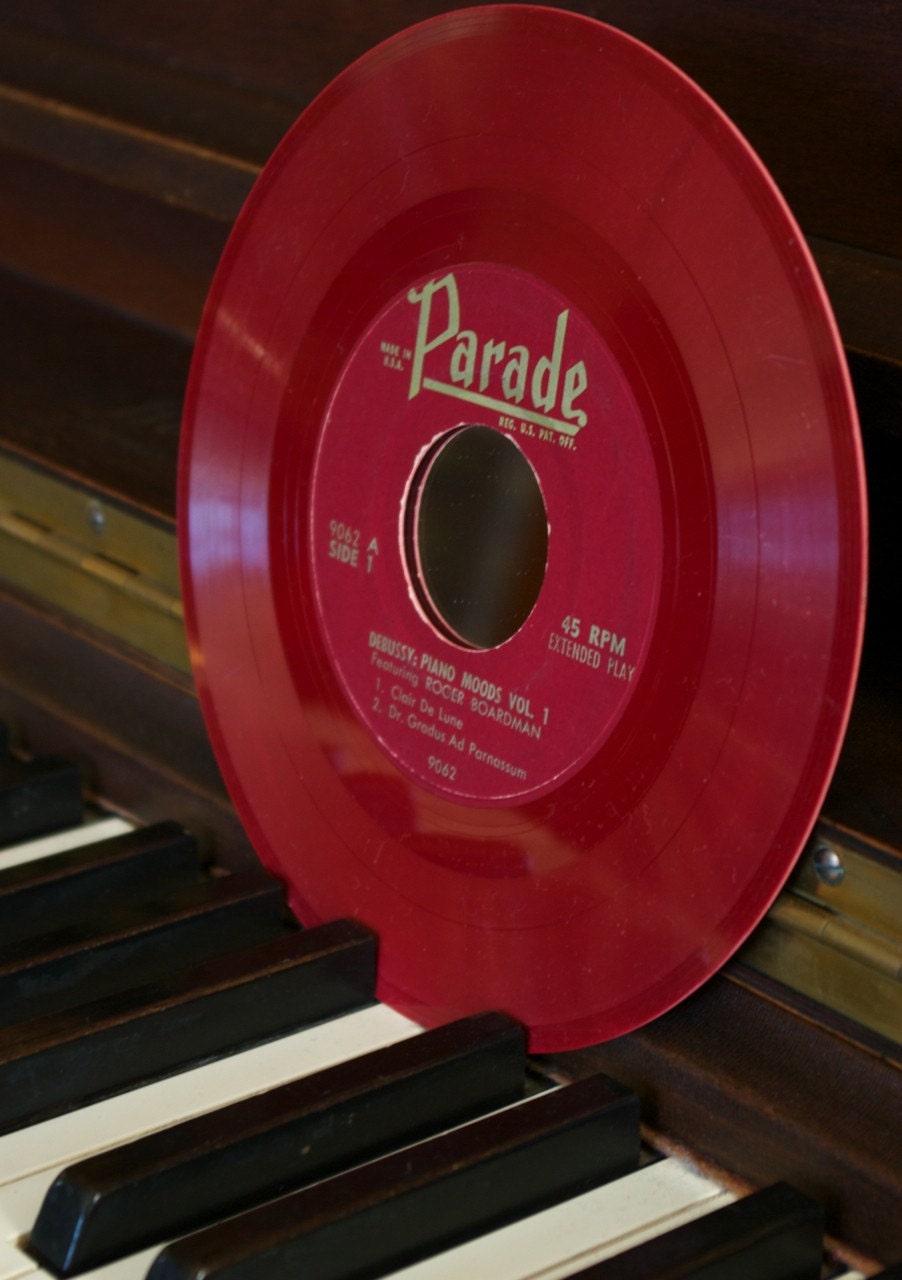
The item above is very simple to make - it's just an unpainted 45 rpm record (a red one, which might be harder to find than the standard black - but they're out there!) with a mirror adhered at the back so that it peeks through the large spindle hole.  You can find 2" round mirrors at any craft supply store.  A good silicon glue will help make sure it sticks.

You can also paint your record first.  Here are some of my painted mirrors.  Mandalas are always great - but a peppermint candy theme is perfect for the holidays!

9.  Make a pinwheel for the garden 


Okay, this is a bit more complicated but you can probably do it!  Just paint your mandala as described above, then use heat to slice into your record and form the "fan blades" (or whatever you want to call them).  It will take some practice but it's actually pretty easy.  Then stick it on the end of a metal stake and put something on the end to finish it, such as an old radio knob. 

You can learn lots more about my Mandala Pinwheels here and here and here.  Also, be sure to read the guest blog about the pinwheels that I wrote for Uncommon Goods.


10.  Make coasters from the album jacket
One thing about using lots of vinyl records - you end up with a lot of empty album jackets.  These can be reused to make all sorts of things such as journal covers, postcards, file folders like this one I got for Chuck, etc. etc.  Coasters are easy to make!

With a 12" album jacket you can get nine 4" x 4" squares.  You can keep all the pieces from one jacket together in a set (it's fun to put them together like a puzzle), or mix 'em up.

People often ask me if the coasters are "coated" with anything to help protect them, and the answer is no.  I prefer to keep them eco-friendly (not coated with plastic), so they may show wear and tear over time. When they start to wear out, you can just toss them into the recycling bin.  It just doesn't make sense to me to add plastic to something that is recycled and supposed to be earth friendly.

Bonus!  Here are even more ideas that I found on the web:

  1. Hang them on the wall
  2. Make a business card holder
  3. Make a ring
  4. Make a room divider
  5. Make rock 'n' roll party decorations
If these don't work out for you, or you are strapped for time, remember you can order from the Eye Pop Art Etsy Shop and receive 20% off your entire purchase during the month of November with the coupon code PORTLAND.

If you do try out any of these projects, please let me know in the comments.  HAVE FUN!

Friday, November 16, 2012

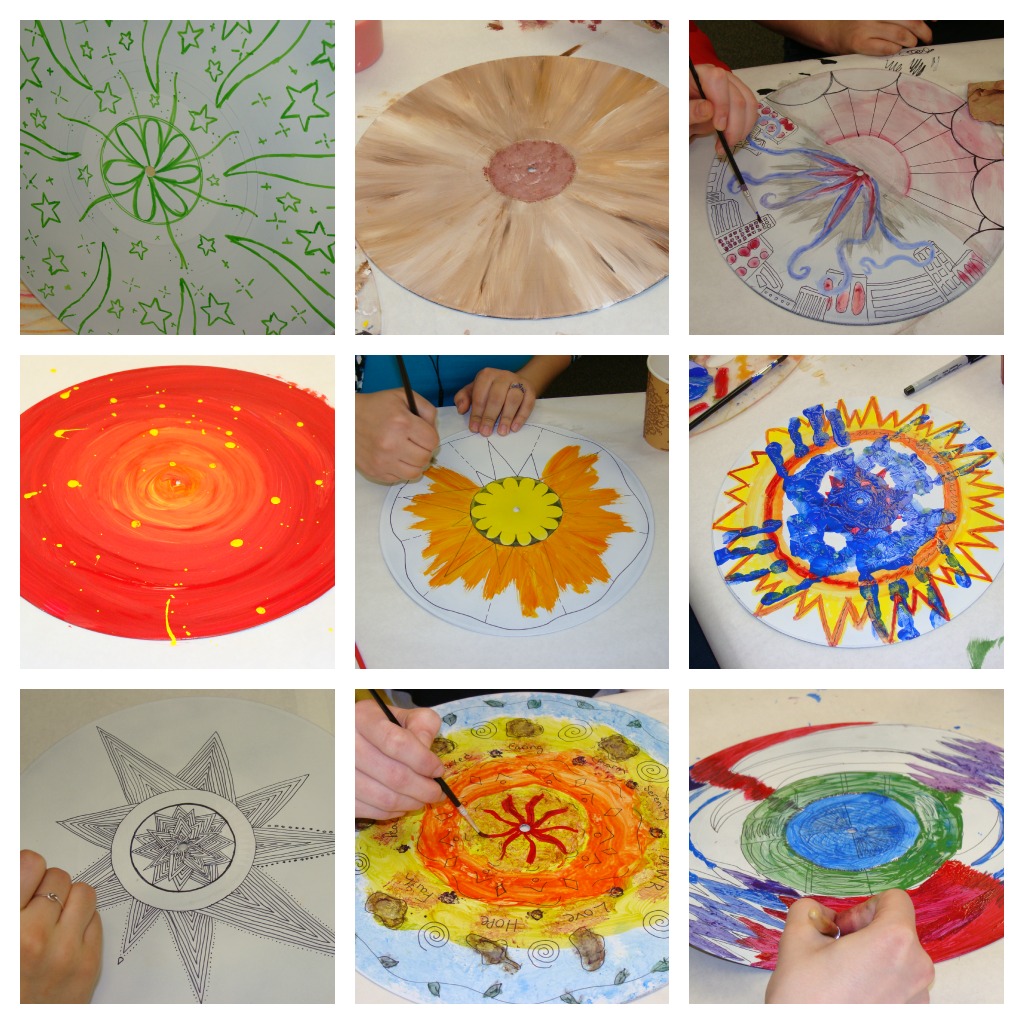
High school artists make beautiful mandalas

Earlier this year I had the opportunity to teach two workshops at the PAC 8 Art Conference.  This is an annual event for a league of high schools to the west of Portland.  My friend Richard Shearing is the art teacher at Glencoe High School in Hillsboro, and he invited me to teach at the event in the rural town of McMinnville, OR.  It was a fun day and it actually snowed, as you can see in the photo below:
Here are some pictures of the students' beautiful work:


Here are some of their finished pieces propped in the window to dry:


It is such a great thing to be surrounded by talented young people who are creative and free.


This last photo is one of my favorites.  This particular student decided to draw on the paper covering the table instead of on a record, and that is just fine with me!

Thursday, November 15, 2012

Valuing Experiences More than Stuff - and other thoughts on Reuse Conex, vintage record players, and traveling 'round the world

Last month I had the opportunity to participate in the Reuse Expo at Reuse Conex, a three-day conference on reuse and sustainability put on by national group Reuse Alliance.  My friend Joanna Dyer (co-founder of SCRAP) invited me to vend at the Expo.

At one point during the day I noticed there was a rack of reusable shopping bags for sale (did you know that in my city of Portland, Oregon, single-use plastic bags have been BANNED from grocery stores?) and they were printed with a very interesting legend.  They said "I value experiences more than stuff" or something like that - wish I'd thought to snap a picture because I found it so intriguing. I could not agree more with that sentiment and I think it sums up the goal of the whole reuse movement.  If you haven't seen it before - go watch The Story of Stuff right now.  (It's only 20 minutes.  Seriously, go watch it.  I'll wait.)

It was a fun and inspiring day.  I was between Oregon Breakers (they fix and rebuild circuit breakers to keep them working and out of the landfill), and Long Way Home (they reuse plastic bottles and tires to build schools in Guatemala).

I also gave a little presentation on "10 Ways to Repurpose Vinyl Records."  Dont' worry - I will be sharing those tips in an upcoming blog post!

Here are some pictures of my table:

It dawned on me that I can and should use old record players in my display!  The one you see in the above photo is my old "Linoleum Hogass" record player. 

Long story but once upon a time at St. Vinny's in Great Falls, Montana, there was a roll of beautiful psychedelic vinyl, and we called it Linoleum.  One day Chuck said he would build a wall from this linoleum to make a room divider in our studio apartment, and I called him a linoleum hogass.  The wall was not built.  The linoleum came back to Portland.  I liked the pattern a lot and named my business Linoleum Hogass Records when I started selling mandalas at Portland Saturday Market in 1998.  I painted the pattern on the record player and used to have it on display at the market with a painted record spinning on it (every booth came with electricity) until something happened, it fried the circuit for all the booths surrounding me, and the lady who made knitted hats yelled at me.  The site manager for the market even attempted to fix the record player for me (maybe he felt bad for that one time he had my car towed after we left it too long in the loading zone) but the fix didn't last (and I do value that experience).  I think the cord is broken.

SIDE NOTE.  Interestingly enough, I have discovered the word hogass in the urban dictionary. And here I thought Melodie made that up in our 11th grade economics class to describe the horde of students descending upon the box full of magazines from which we were to cut images for a collage on the joys of consumption in a free market system.  What a bunch of hogasses.  (Or, hogii.)

Anyway, the record player doesn't work anymore but I can still use it in my booth!  I might never have thought of this, but recently an old friend of mine from high school (not one of the above-mentioned high school hogii) gave me another cute vintage kids' record player - which you can see here:

This particular old friend was in the process of getting rid of all of his belongings in order to embark on a journey around the world with his wife and daughter!  Now THERE is a family who values experiences more than stuff!!  I am honored to be gifted with his childhood toy record player.  I remember many an afternoon hanging out with friends at his house in downtown Oregon City...wishing them all the best on their big adventure!

(They have a blog and you keep up with their journey at www.travel-junkies.comThere was a great article about them in the Oregonian this week too.)

What you see above is some cool new packaging I've come up with for my Vintage Record Clocks.  YES!  Finally, a solution for the boxes and boxes of album jackets (they can't ALL be made into coasters), the lack of wall space for displaying the clocks, and the difficulty of storing them in between sales.  I am making the boxes out of 12" album jackets which make a perfect package for a 10" record clock. 

Obviously the jacket used is not for the same record as the clock that's inside (that would not be possible) but I did have fun matching them up loosely based on a general theme.  (You can now buy these at Tender Loving Empire and SCRAP's Re: Boutique.)


Ad don't forget, PORTLAND RECORDS!  Because Portland rocks!  And PORTLAND is still the secret code you need to save 20% off everything in the Eye Pop Art shop during the month of November.  Not that you need any more STUFF...but there is a big gift-giving holiday coming up, and if you're going to buy stuff, may I suggest you buy stuff that is handmade by an artist from reused, recycled, and repurposed materials?  That way, you can value the experience and the stuff...at least, a little bit more than when you buy something from the mall. 

Wednesday, November 14, 2012

More Custom Black Light Love

I'm currently having a really groovy time working on a special custom 16" black light mandala.  It's for a DJ who tells me that he plans to make a custom rotating display for this piece.  I hope he sends me a video when it's done!  I think that's such an amazing idea for creating a kaleidoscopic, psychedelic visual experience. Just imagine it spinning...

It's hard to paint with the black light reactive paints because you don't really know what color they are going to be until you look at it under a black light.  I've set up a spot inside my closet so I can check the work in progress.  This is what it looked like after I finished filling in all the colors. 

Here's what it looks like in natural light (I am almost done outlining with black):  

Click here to learn more about my black light mandalas.   You can also check them out in my Etsy shop here and here, and even more mandalas here.  I'd be happy to make a custom mandala for you, or maybe for the DJ or record collector in your life?  This is a great time to place your order for holiday gift giving, and you can get 20% off everything in the Eye Pop Art shop during the month of November with coupon code PORTLAND.  Have a groovy day!

Tuesday, November 13, 2012

Portland Records

Greetings from Portland, Oregon, USA!  Last month I had some fun revamping my painted mandala "turntable art" and transforming the pieces into Portland Records, which you can purchase here.  Fancy cut-out action!  Keep Portland Weird! 


Some people say they look like saw blades, but they are actually made from 12" vinyl records.

The record is easy to hang with a nail through the spindle hole. You can also spin it on your turntable (without the needle) for an eye-popping psychedelic treat. Or leave it on the turntable to make it look awesome when not in use!

My mandalas are all drawn freehand without the use of any special tools or measuring devices. These are original designs, hand drawn (NOT computer generated).

Do you need a one-of-a-kind handmade psychedelic Portland souvenir or gift?  Order one of these or anything else in my shop during the month of November and get 20% off with the coupon code...you guessed it...PORTLAND.   Because we love this town. 

Monday, November 12, 2012

I Have a Shipping Room! (Before & After)

After being in business for 9 years, I now finally have a dedicated room for my business.  It's mostly a shipping room but I'm also using it to store inventory and extra supplies, and to do my product photography.  I had to kick my eldest child out of the house to make this happen, but hey, you gotta do what you gotta do! 

Okay, the truth is, I didn't really kick her out.  Her smart brain bought her a ticket to a bright future.  Can I just brag for a minute?  Tangereen graduated from high school in June with the following honors: International Baccalaureate diploma, Honored Scholar Award, Salutatorian, Distinguished Scholar, National Honor Society, University of Portland President's Scholarship, co-captain of Cleveland Cannibals OSAA state champion speech and debate team.

She earned enough college credit during high school, including classes at PSU through the LINK Program, to earn her bachelor's degree in three years instead of four.  Tangereen is now attending a great University and majoring in physics. She has already been invited to do research in quantum mechanics next summer - how's that for a first job?


So basically, she moved to her campus and is enjoying the dorm life.  Because she's still in Portland, we see her every weekend, and she either crashes on the couch or makes herself a nice blanket fort underneath my shipping table in her old room.  It works out just fine for everyone!

We spent a good amount of the summer working on the big transition of having our child graduate, turn 18, move out of the house, and start college.  It was a pretty intense and emotional time.  I really jumped on the excuse to keep busy by completely cleaning and organizing pretty much my entire house.  Things were getting crazy anyway because Chuck got a computer and we decided to make him a little office space in the kitchen, mostly so he can listen to people reading history books and Tolkien lore on youtube while he cooks.  This meant the kitchen table was moved out to the living room and by the time that happened the house was upside down and there was nothing for it but to throw myself into a complete and total overhaul of the whole place.  I dusted every nook and cranny, organized every closet, set a fresh "free box" on the curb every night for a week, and still took a large haul to Goodwill. 

Once Tangereen had vacated her room (with the exception of a shelf in her former closet where I'm letting her keep her personal craft supplies - of which she has a TON, mostly beads), I set about moving everything into the room that needed to be in there.  I previously had shipping supplies, craft materials, and finished products stored in various places around the house, including my closet and some areas of our basement.

The key was to consolidate everything into one room and have it be nice and organized without spending any money.  My actual studio is still located in the nook in my giant master bedroom/home office.  That's where I do all the creating.  But now instead of having to clean up my art mess in order to have space to pack orders, I have a completely separate room for shipping and I could not be happier, especially going into the holiday season. And, I did not spend hardly a dime.  I was able to incorporate Tangereen's dressing table, wardrobe, and bookshelf, and Chuck let me have the 6' foot table, since we don't really need it in the band room anymore, as well as the record player, which no longer works as a record player but does have a radio and CD player built in, so I can get my NPR fix or crank up Social Distortion while I'm in there.  And of course I can spin a mandala on it any old time.

I bought baskets for garbage and recycling from the dollar store (a total of $2) and scored a really great desk lamp on clearance at Office Depot for only $5 (normally $55!  I got it after these pics were taken but trust me, it's amazing).  That's all I bought!  I found a drawer unit on the side of the road which I cleaned up and am using to store odd-sized records.  I had originally thought about going to Ikea to get some really great shelving units and matching bins and things, but ended up not having to.  I didn't have to paint the room either, because it was already done in a great reddish pink with purple accents and matching curtains and that cool faux stained glass vinyl decal.  I decorated the room with things from my collection of children's art, jazz posters, Dartgun stuff and Eye Pop Art stuff.  I know it looks really cluttered but that's the way I like it: constant visual stimulation.

BEFORE:

You might notice there is a sewing machine in this picture.  It was given to me several years ago and needs a tune-up. At some point I would really like to take up sewing again.  Most people don't know this but I used to love sewing.  I did a lot of hand-sewing but also have made clothing and quilts with a sewing machine.  One of these days I'm going to get that machine working and start playing with it.  At least I was finally able to liberate it from the hall closet.

In case you were wondering, the painted TV is a piece by our old friend and former Dartgun drummer Billy Brahm.  Many years ago we did a trade in which I painted his acoustic guitar in exchange for the TV art. It was only in there while I was cleaning and is now back in the living room where it belongs. 

What you see in the photo above is the majority of my collection of Psychedelic Coffee Cups (not all of them - there are still plenty hanging from hooks in our kitchen ceiling).  I have a gazillion of them.  I can't even believe they all managed to fit in the living room.  Well, I decided that I really wanted access to my books.  The cups were all over the bookshelves, collecting dust and keeping me from ever being able to put a book back properly after reading it.  So I ran them all through the dishwasher (4 or 5 loads) and put them in boxes and crates to await their next adventure.  (And yes, I completely organized all of our books too.)

I have been saying this for years - I really want to open up a vintage shop on Etsy for my groovy vintage cups.  I don't think it's going to happen before the holidays, but I'll definitely be ready to get started on the product photography and everything in the new year.

Here are a few more "before" shots of the room as it got more and more filled with stuff:


AFTER:

Here's what the room looks like now.  I covered the table with brown kraft paper and left space on the other side so that I can utilize light coming through that window for photography purposes.  Most of my small supplies are stored in the drawers and in various little containers scattered about the surface of the tables.  Shipping supplies are stored under the dressing table and to the right of it.  Primed records are in a crate under the table, and inventory is stored in bins on the shelving units. 

I found this drawer unit on the side of the road and it is now perfect for storing records - 45s on top, red records in the middle, and 78s on the bottom.


I put up that bumper sticker that says "Small Business Creates Jobs" as a reminder to myself that this is, in fact, my job, and the only job I have, so I better make it work! (I was laid off from my nonprofit job in April so I am truly 100% self employed now.)


Johnny Teacup just loves that brown paper on the table, and he likes to look out the window.


See that psychedelic painted trunk?  It is crammed solid with my collection of gorgeous vintage fabrics that I have been accumulating for about 20 years.  Oh, when I start sewing...


I finally found a home for my collection of crafty buttons!


Oh the joy of having enough space to assemble 18 clocks at one time!  It's like a dream come true.

Now let's bring on the holiday orders so I can make full use of this room!  Order from Eye Pop Art in November and get 20% off your entire purchase by entering the coupon code PORTLAND at checkout. Thanks for your support, and happy holidays!